|
Swan Valley Course
Overview
Front 9 | Back 9
Click here
for aerial view of the course
(warning: large file, may take a while a to load)
| |
|
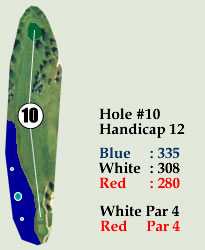 |
Take a breath you just finished
the toughest hole on the course. A pond runs down the left side of
the fairway on hole #10. Split the pine trees with your tee shot and
a large green awaits your second shot. A birdie here and your back
9 is back on the right track
|
| |
|
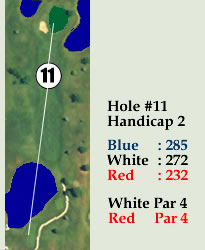 |
This short par 4 is drivable
from the white tees but beware of the pond on the right side of the
green. If you play this hole smart off the tee with a 3 wood or long
iron, you will be rewarded with a birdie. The large green slopes from
front to back and has many tough pin positions to choose from.
|
| |
|
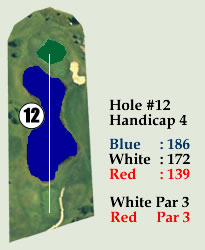 |
The first of two par threes
on the back 9. All carry on this tee shot and anything short and your
ball may be swimming. Prevailing northern winds always make club selection
on this hole difficult. The green has many undulations to it and can
yield a bogey if your not careful. |
| |
|
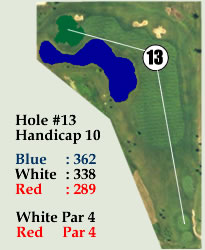 |
This par four dogleg left wraps around
a large pond with out of bounds on the left. Some golfers choose to
lay-up to the pond and hit a mid iron into the green. Those who choose
to use driver are rewarded if they place the ball in the middle of
the fairway. The two-tiered green is narrow and long, don’t
get snake bitten on this hole with a three putt. |
| |
|
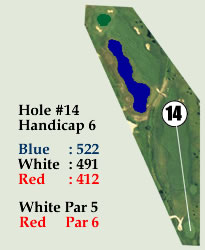 |
The only par 5 on the back 9 with a creek
running down the left side of the fairway and out of bounds on the
right side of the fairway. A nice drive short of the creek crossing
the fairway will leave you 250 to the green. A wide landing area for
you’re second shot, but beware of the pond lurking to the left
of the fairway. Get it close on your third shot for a one putt and
a birdie. |
| |
|
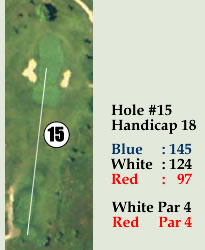 |
The easiest of the par 3’s
on the course, but not a for sure birdie. A two-club swing from the
front of the green to the back of the green. Two sand traps protect
the green from arrant shots. |
| |
|
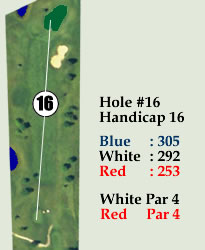 |
A nice par 4 that can be driven from the
white tees. If you are a long ball hitter give the guys on the green
a chance to get off the green before hitting. Get your second shot
close to score a birdie because it may be your last birdie of the
day. |
| |
|
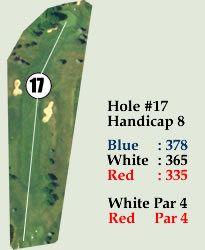 |
Two sand traps are placed
strategically at the point of landing from the tee box. Position the
tee shot in the middle of the fairway and a mid-iron to the green
is all you have left. Slice the ball to the right, don’t worry,
you still have a clear shot to the green. A tough green to hit and
stick the ball on the green. Take you par and run. |
| |
|
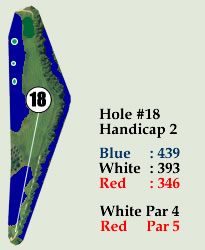 |
The second toughest hole on
the course and what a finishing hole it is. The fairway may look small
but the landing area for your tee shot is very generous. Don’t
be intimidated by the water next to the tee box, the water left of
the fairway or Swan Creek to the right side of the fairway. Grip it
and rip it and place your tee shot in the middle of the fairway leaving
a mid-iron to the small narrow green. Keep your second shot on line
with the flag or say good-bye to your ball, pond left and creek right.
|
|
